Now here is a little tutorial to show you how to make your own spooky scene.
You'll need:
Versamark ink
Embossing powder in clear and black (and separate trays or paper plates so they don't mix)
Post It notes
1" circle punch
Sponge daubers/ foam tools
CTMH Exclusive inks in Honey, Sunset, Chocolate, Outdoor Denim, and Black
Tree Stamp set (I used Spellbound which is retired but any tree set will work)
Step 1:
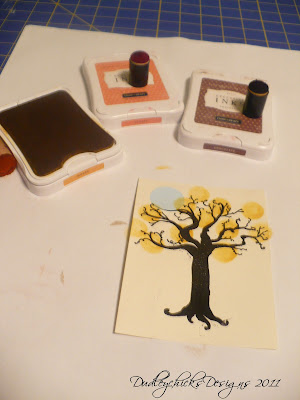
Stamp tree image with Versamark ink.
Add black embossing powder and heat with heat gun.
Step 2:
Using a 1" circle punch punch out a circle that will be used to mask out the moon. Add the punched circle to the tree top where you want the moon to shine through. Be sure to punch the sticky area of the post it note so your "moon mask" stays on while you complete the scene.
Step 3:
Using sponge daubers add fall foliage colors to the top of the tree. I used three colors here, Honey, Sunset and Chocolate. Start with the lightest color and keep adding until the tree top is fully colored. Use the chocolate dauber to add the ground below the tree as well.
Step 4:
Use the heat gun to heat set the tree top colors so they
won't hold the embossing powder during the next step.
Step 5:
Using a leaf stamp (this one is from the Grown With Love set) and Versamark ink stamp leaves over the colored tree top area at the ends of all the branches. It will be hard to see where you are stamping but it doesn't have to be perfect, just start at one side and work your way across the tree.
Step 6:
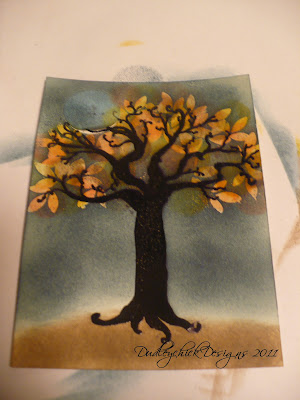
Add clear embossing powder. Tap off excess (don't worry of some sticks to the already embossed tree). Heat with heat gun making sure all of the leaves turn clear.
Step 7:
Using the foam tool (or sponge dauber) go over the entire top of your card with Outdoor Denim ink creating a night sky. Be sure your "moon mask" is secure through this process. Continue until desired darkness is reached (less for a twilight look, more for a midnight sky).
Use a paper towel to rub off any excess ink from the clear embossed leaves.
Remove "moon mask" to reveal a spooky full moon.
Step 8:
Add additional spooky images like the black cat and bat shown here from the Wicked August SOTM or the fence shown in the version above which is also included in the Spellbound set.
Finish it off with a coordinating mat to make the colors pop.
I used Sunset.
I used Sunset.
Attach to a card base and wait for the oohs and aahhhs.
As seen on


4 comments:
Love it LeAnne. Can't wait to give it a try.
Love the card, and your tutorial is fantastic!
Love your spooky tree! I would love for you to link this up to My Favorite Things Halloween Party going on all month! I hope to see you there!
XoXo
~Iffy~
www.StayAtHomeNation.blogspot.com
Hi Leanne! I wanted to let you know you are in My Stay At Home Nation Spotlight this week! Stop by & check it out. Be sure to grab my button & post it on your blog somewhere too. I can't wait to see what you link up next! Thanks so much!
XoXo
~Iffy~
StayAtHomeNation.blogspot.com
Post a Comment