Friday, November 30, 2012

December SOTM Blog Hop - All Year Cheer

 
Hello and welcome to the December blog hop.
 Hard to believe that 2012 is quickly coming to an end. 
I hope the year has been a good one for you 
and yours. 
 
If you have arrived here from 
Carla Ironside's blog
 
 then you are right on track.
 Enjoy hopping through to see what everyone has created. 
 
This month's set is called All Year Cheer and it is so fun!
 
Don't you just love all the great images for calendars, 
scrapbooks or cards all through the year. 
 
 
Here is the card I made


I saw the sunburst idea originally on Pinterest and thought 
it was so cool. There is a great tutorial 
on how it is done HERE that I followed to make this card. 

I love how it came out with the bright papers from
the Flirty paper pack. 

Supplies Used

SOTM Set All Year Cheer
Flirty Paper Pack
Color Ready Seam Binding Ribbon
Bitty Sparkles
Exclusive Inks in Black and Goldrush
Goldrush Alcohol Marker
 
And here are the cards made by the rest of my swap group.


Thanks for stopping by. Now hop on over to 
Annette Green's blog
 to see what wonderful things she has created. 

Wednesday, October 31, 2012

November SOTM Blog Hop ~

 
Hello again and welcome to the November Stamp of the month
 Blog Hop. If you have arrived here from 
 
Katy Taylor's blog 
 
then you are on the right track and enjoy the hop. 
There are mopre than  50 consultants showing us 
their awesome ideas for using
 
Capture the Date 


 This great set lends itself to so many things; 
scrapbook pages, calendars, journals and so much more!
 
However, since I am in a swap group that makes cards 
using each of the SOTM sets I had to figure out how to 
use this set to make a card. That was a bit of a challenge 
for me, but this is what I came up with. 
 
 I wanted to make a birthday card for a milestone birthday. 
But since I make multiple cards for everyone in my group 
I realized that not everyone would need a birthday cards for a 21 year old. 

That's when I decided to make it a spinner card when the sender 
could choose which milestone by turning the circle. 
Below is a photo showing all of the options I made. 
It's kinds a fun twist I think.
 
 Supplies Used:
la Belle Vie Paper Pack
Black Tulle Ribbon
Cricut Artiste Cartridge
Black Exclusive Ink
Gems from the Boutique Assortment
Black Brad


And here are the cards made by the rest of my group. 
 

 I just love working with these awesome creative ladies!!
 
Now hop on over to
 Doreen Guilfoyle's blog 

To see what great artwork she has to share. 


Sunday, September 30, 2012

October SOTM Blog Hop ~ Very Merry Christmas

 Hello and welcome to the October SOTM blog hop.
 If you have arrived here from 
Katy Taylor's blog  
then you are on the right track, enjoy the hop.
 There are more than 50 consultants sharing their wonderful ideas and 
awesome artwork using this month's set.

Very Merry Christmas

 This is the card I made for this month's swap.
 
 
 As usual I was assigned a paper pack for the swap.
This month I was assigned Clementine. While I love the Clementine 
papers I had a hard time seeing them as "Christmasy".
 According to the rules of our swap we are supposed to at least
 use one of the B&T designs. Admittedly, I used the bare minimum on this card. 
The blue design on the top is from Clementine. The rest of the card uses two
 of our new colors, Ruby and Slate. I embossed the Slate piece of cardstock 
with a snowflake Cuttlebug embossing folder and then sanded it
so that the white core shows through. I love that effect!
 All of the shapes were cut on The Cricut. I finished it off with a bit of bling
and some Slate dotted ribbon. A Very Merry Christmas indeed.  

Supplies Used:
October SOTM set - Very Merry Christmas 
Clementine Paper Pack
Ruby Cardstock
Slate Cardstock
Colonial White Cardstock 
Ruby Exclusive Ink
Cuttlebug Snowflake embossing folder
Distress Kit
Slate Polka Dot Ribbon
Black and Grey Sparkles 
Artiste Cricut cartridge 

 
 Now hop on over to
 Krista Ritskes blog 
 and see what she has created. 
See you next month!

Monday, September 10, 2012

Clearance SALE!!!!

I just celebrated my three year anniversary with CTMH! 
I really do love working with and for this company!
 The only downside is that in that time I have collected A LOT of STUFF.
 With the release of the latest idea book I decided that it was time to do some purging.
 I must admit it was hard to let go of some of my favorite "friends"
 but I need to make room for the new stuff so...

 and let me know if you would like to give any of my "friends" a new home.

Friday, August 31, 2012

September SOTM Bloh Hop ~ Fall Favorites


Hello everyone and welcome to the September SOTM Blog Hop. 
If you have arrived here from Jen Patrick's blog you are on the right track. 
Keep on hoppin' though, though there are more than 50 consultants 
in this hop showing you their beautiful artwork so enjoy!

Before I get started on this hop I want to apologize for not getting my pics of last month's project up until today. August was a crazy month for me, living in three cities in two states out of a suitcase for 5 weeks kind of throws a wrench in the crafty plans. If you would like to check out my project 
using Baroque Borders click HERE.

Now for this month's project using this awesome stamp set, Fall Favorites. 


I have loved coloring since I was a little girl, and I still find it very relaxing to bring an image to life with COLOR! This set is perfect for coloring. It was also perfect for trying out our new alcohol based markers. If you like Copic markers you will LOVE these. They come two to a set so you have a light and a dark shade of the same color for less than you would pay for ONE COPIC...isn't that awesome!!

So, here is the card I made 

I was assigned the Pear and Partridge paper pack this month.
 I honestly kind of like when I get assigned papers and stamps that you wouldn't think of together, I enjoy the challenge. For this card I used the leafy B&T paper from Pear and Partridge and added New England Ivy and Goldrush cardstock to make it feel more like fall.

Don't you love those swirly designs and that shaped window? 

This card and wrapper are both cut using the new Cricut Artiste cartridge 
(these were cut at 5 1/2 inches in case you are wondering).

Here is the inside card, the back is blank for writing on. 

And here is a close up of the coloring. I am not an expert, but I do love how easy it is
to shade and blend with our new markers. I can't wait to get them all!

Supplies used:
Pear and Partridge paper pack
Chocolate cardstock
Goldrush cardstock
Artiste Cricut cartridge
Antique Copper brads
Creme' Brulee marker set
Autumn Terracotta marker set
Ruby marker set
Juniper marker set
and 3 Copics (blues and brown)

Now hop on over to Gina Brandstetter's blog to see what she has created.


Tuesday, July 31, 2012

August SOTM Blog Hop -

Hi folks and welcome to the August SOTM Blog Hop. This is the first hop of the brand new Fall/Winter 2012 Idea Book. If you would like a copy click on the Request A Catalog tab above and I will send you one.

If you have arrived from Tamera Pope's blog you are on the right track. This month I am not at home so I will be adding my artwork a little late, please check back to see what I have done using this month's SOTM set and the new Artiste Cricut cartridge.

This month's stamp set is called Baroque Borders, isn't it gorgeous!


 Here is my card, sorry it took me so long to post the picture.


 Supplies Used:
Pemberley paper pack
Artiste Cricut Cartridge
Exclusive Ink in Desert Sand
Ribbon from Pear and Partridge WOTG kit


Now hop on over to Shirley Pope's blog to see what she has created.  Happy Hopping!

Thursday, July 12, 2012

Retiring Colors, papers, etc

There lots of things retiring after this catalog (Aug.1) including 25 retiring colors so if you need stamp pads, markers (all the current markers are retiring), re-inkers etc to finish projects get them now. Most of these colors are only available in cardstock as a part of a shade pack but the shade packs are retiring too so get them while you can.

 There are also four of the current paper packs and their coordinating embellishments that will be gone after Aug. 1

Lucy
Footloose (wood shapes are already gone)
Superhero
Cruisin'

 Here is the list of retiring colors.

Grey Flannel
Grey Wool
Brown Bag
Vanilla Cream
Parchment
Baby Pink
Taffy
Sunkiss Yellow
Key Lime
Heavenly Blue
Lilac Mist
Amethyst
Holiday Red
Sunflower
Sunny Yellow
Dutch Blue
Moonstruck
Vineyard Berry
Tulip
Garden Green
Spring Iris
Petal
Garnet
Ponderosa Pine
Pansy Purple

Order what you need NOW! http://dudleychickdesigns.ctmh.com

News from the Dallas CTMH convention...

Kinda wishing I was in Dallas right now at the CTMH convention with all my friends. I am hearing some GREAT things though. Here's some of what I have heard so far.

1. Another new Cricut cartridge with 700+ more shapes to cut (still comes with 3 stamp sets and coordinating chipboard shapes)
2. New Alcohol based markers, a set of two coordinating colors is only $5.95 and there are 40 sets!
3. New 40 color palette with 6 brand new shades (4 new groups)
4. Mini pigment ink pads, 10 in a set and available in all four color groups
5. 13 new Workshop on the Go kits including card kits, album kits, scrapbooking kits, party kits and home decor.
6. Studio J will no longer require a membership, EVERYONE get access to all the great layouts. Plus, a new drop pic express option and lower print pricing.
7. New Basics Consultant kit, join this awesome company for just $49!
Stay tuned, more news to come!

Saturday, June 30, 2012

July SOTM Blog Hop ~ Live Out Loud

Hello and welcome back for another SOTM blog hop.
If you have arrived here from Michelle Loncar's blog then you are on the right track. 
 This is the last SOTM set in our current Spring/Summer Idea book.
 Are you as excited as I am to see the new Idea Book?

July's set is called Live Out Loud and its a fabulous set of 8 awesome sentiments. 
This month my assigned paper pack was Crusin'. And since I was making these cards just before Father's Day knew I wanted to make some "man cards". I decided to also use the car image from the Cruisin' WOTG kit. I just love that classic car and it stamps so beautifully.

So here is the card I made

I wanted the car to look like it was driving along a road so I stitched the white lines with white embroidery floss, using our awesome clear ruler to poke the holes for perfect spacing. I then stamped the image and accented it with our new durables in the corners to make it look like a billboard. Finally, I cut small triangle flags from the decorative border of one of the Cruisin' papers to make the checkered flags.

Products Used
July SOTM Set Live Out Loud
Cruisin' Paper Pack
Cruisin' WOTG Stamp Set
Exclusive Inks in Twilight and Cranberry
Durables Studs
Embroidery Floss Neutral Assortment
Clear Ruler
Piercing Tool Kit

And here are the cards made by the rest of my team. 


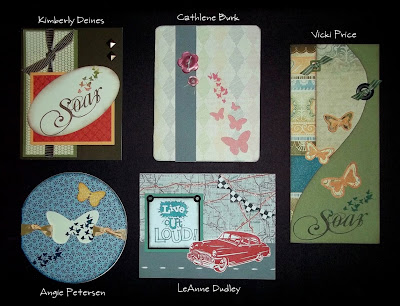
I think it is funny how I was the only one out of my group who did not use the
 butterfly SOAR image but all of the cards are still so different. 

Now hop on over to see what wonderful things Brae Montgomery has done with this set. 


Tuesday, June 26, 2012

Love Birds...

Once upon a time my daughter had a room mate. I'll call her Jessica, (because that's her name). Jessica finished her college education and took a job in a tiny town for the summer. In that tiny town there was a boy. I'll call him Jacob or Jake for short.  Despite the fact that  Jessica was only in the tiny town for a short while, Jessica and Jacob fell in love and decided to get married. Since my daughter is one of Jessica's bestest buddies she offered to help with the wedding. And in the process of offering her own skills in cake making, decorating and other friendly wedding duties somehow I got volunteered to "help" make the invitations.

Jessica wasn't sure exactly what she wanted but she wanted to somehow incorporate trees. I went to my favorite place for inspiration...PINTEREST. I found and pinned lots of ideas for Jessica as a place to start. This is the pin she liked best. It is from an Etsy shop and can be found HERE.

I thought, "I can do that" and starting thinking of stamp sets and colors that I could use to recreate if for Jessica and Jake. I made a few samples using different color combinations. And met with Jessica to make some decisions.


This is the prototype we came up with.

 Then I waited for the numbers, how many were they going to need? Jessica waited for the lists to come in from both families but she thought they would need about 150 invites.

"I can do that", I told her (wondering what it was really going to take to hand stamp 150 invites). When the final numbers finally came in it was 250 invites. I can honesty say I thought to myself, "What did I get myself into.". We had decided on the colors (Chocolate, Sweet Leaf, Smoothie and Colonial White) so I ordered the cardstock and we planned a weekend to get the girls together to make them.

I cut all of the pieces ahead of time and my daughter and I started stamping.   First came the trees, I used the CTMH stamp set Grown With Love (retired). Jessica really liked the "carved" heart that was on the original one we saw so we had to figure out how to carve a heart out of our tree. We decided to cut small hearts out of sticker paper using the Art Philosophy Cricut cartridge to mask out a heart shape on the tree trunk. Instead of completely removing the mask before stamping which would leave a white heart we left the stickers on the stamp and inked it with Chocolate and then stamped. Because the sticker paper absorbs the ink instead of sitting on top we got a brown heart with a different texture than the rest of the tree with a nice outline that just happened (I love happy accidents). .


Next come the leaves, stamped in Sweet Leaf.
  
Each invitation has 14 stamped leaf groups. 


And then come the birds stamped with Smoothie. 
The birds came from the CTMH Childhood Portrait stamp set 
and luckily there are two birds in that set, one facing each direction. 

We added the initials inside the heart with a Chocolate marker. 
When we were done our stack looked like this.


For a bit of perspective here is our stack compared to the height of three stamp pads. 
Pretty impressive if I do say so myself!

Now that all of the stamping was done we were ready for an assembly party.
I gathered all of the supplies (and a stash of chocolate and Diet Coke)
 and the bride and her friends showed up to help. 


Left to right ~ Lauren, Ashleigh and Jessica (the bride)


Angie and Lauren work on assembling. 


 And here is the stack of 250 finished invites. 
We add a photo of the cute couple (sorry for the blurry phone pic)
 and tie it off with a hemp bow and they are ready for the mail.


Ashton and Lauren line up the envelopes. 
WE DID IT!!

Congratulations Jessica and Jake, glad to be a part of your special day. 
And also glad to know that I CAN make 250 hand stamped wedding invites...who's next?


Thursday, May 31, 2012

June SOTM Blog Hop

Hi and welcome to the June SOTM Blog Hop. If you came from Kami Welter's blog you are on the right track. We have more than 50 fabulous consultants showing their awesome artwork using this set so enjoy the ride!

This month our set is called Life is Tweet, isn't it SO cute!

I had so much fun with this set. One day my friend and I just decided to sit down and make cards. I had just gotten this set and the Dotty for You paper pack and so we went to town. I also had the  paper pack assigned for my swap group so I had lots of ideas flowing.

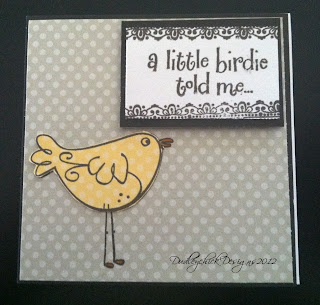
This first card is the one I did for my swap. I paper pieced the bird with the dotty for you paper. I just love how you can mix papers from different packs and they always match perfectly.


And here are the pics from my swap groups. 


These next ones are the some of the ones my friend and I did using the Dotty for You papers.


 We had a great time with this set, and I am sure you will too so get yours today.

Supply list

June SOTM  - Life is Tweet
Footloose Paper Paper Pack
Dotty For You Paper Pack
Bitty Brads 
CTMH Exclusive Inks in various colors
Sweet Leaf Stitched ribbon (retired)
Seam binding ribbon


Now hop on over to Adeline Brill's Blog to see what she has created.
 Thanks for stopping by.

Monday, April 30, 2012

May SOTM Blog Hop ~ Friendship Bouquet

Hello and welcome to the May SOTM blog hop. 
If you have come here from Tamera Pope's blog then you are on the right track, 
it is one great big loop of creative inspiration. 

This month's set Friendship Bouquet is such a beautiful set. 

I love sunflowers and gerbera daisies and this set can easily be colored to be either. Since my assigned paper pack for this month is Lucy I decided that I would be making pink daisies. 

Here is my card


And here is another view with the band removed so you can see how it opens.
 I love these die cut cards, they are so cute!!


I was recently giving sewing lessons to the teenage daughter of a friend and we were working with grey and pink and I just loved those colors together. So, since I still had pink thread in my sewing machine I thought why not sew on some Grey Wool cardstock as an accent for my card. 

Here is a close up of the sewing on the band closure of the card.


I love how the pink just pops off of the grey wool. I need to do more sewing on my projects!

I also knew that I wanted to use the daisy to make a layered 3 dimensional flower.
 I love the technique of cutting only part of the flower for each layer 
and then stacking them for a 3D effect.
 This set is perfect for that technique.

Here is a close up of the 3D flower. 

I think this set might be getting lots of ink this spring and summer! 
Don't forget that you can only get it throughout the month of May

Supplies Used:
Friendship Bouquet May SOTM Set
Lucy paper pack
Exclusive Inks in  Grey Wool, Creme Brulee, Blush
Stardust Glitter Glitz gel
Watercolor Pencils
Blender Pen
Colonial White Die Cut cards
Art Philosophy Cricut Cartridge

Now hop on over to Jen Rubio's blog to see what she has created.

Tuesday, April 3, 2012

For My Peeps

I don't know if you have tried Pinterest yet, but if not you really should. I will however, tell you in advance that it is highly addictive. I have pinned more cards, scrapbook pages, recipes, sewing/ DIY projects than I will ever have time to try if I live to be 100 years old,,,and I keep pinning!

It was on Pinterest that I saw originally saw the idea for peep s'mores.
 Here is the link to the original pin
 And here is another version I pinned for a printable bag topper available on Etsy.

As soon as I saw it I know I wanted to make my own version using CTMH's new My Peeps stamp set.

So I gathered my supplies

And went to work.
 Here is what I came up with.

(sorry about the blurry pic)

And here is a closer (and clearer) pic of my cute bag topper

 I used sponge daubers to dab different colors of ink on the eggs and the grass behind the bunnies,
 such a fun way to get multiple colors on a single stamp.
And since I had a few extra bunnies already cut out I made this card too. 


Happy Easter to all my Peeps!

 CTMH Supplies Used:
 My Peeps Stamp Set
Inks in Pear, Smoothie, Gypsy, Hollyhock, Honey, Lagoon, Cotton Candy
Cardstock in White Daisy, Chocolate, Pear, Cotton Candy, Lagoon, Sunny Yellow, Gypsy
Dotty For You paper pack (on card)
White Daisy die cut card

Stripe paper is from my stash (Doodlebug Designs)
Peeps bunnies
Snack Size Hershey bars
Graham crackers
zipper sandwich bags

Pin it