Friday, September 30, 2011

October SOTM Blog Hop - Holiday magic


Hello and welcome to the CTMH October Stamp of the Month Blog Hop.
If you have arrived here from viewing Angela Tutton's fun creations then you are hopping right along.

I know it's only October but it's beginning to look a lot like Christmas around here,
and it's just in time to get some fantastic ideas for your holiday projects this year.

The October Stamp of the Month set Holiday Magic is so much fun.
This set includes 18 mix and match holiday images for unlimited possibilities. 


This month for my swap I was assigned the Typeset paper pack to go with this set. You may not think of the Typeset papers as being at all "Christmasy", but I actually really enjoy thinking outside the box and using papers and materials in unexpected ways. Here is what I came up with.


I wanted to create a  vignette, something like the decorated shop windows you see during the holiday season.  I used the Art Philosophy cartridge to cut the "window" as well and the trees. It makes everything so much easier. Too bad the sleigh and rudders weren't on the cartridge as well. I would never have attempted to make multiples of a card like this with so many cut pieces before Art Philosophy, but now it's possible!

Supply List:
Typeset Level 2 paper pack
Holiday Magic Oct SOTM 
Clear Sparkles
Bronze Glitz Glitter Gel
Stardust Glitter Gel
Exclusive Inks in Juniper, Creme Brulee,Vineyard  Berry
Cricut Art Philosophy Cartridge
Foam Tape
Here are the cards from my entire swap group. Such talent!
From top left cards created by; LeAnne Dudley, Cathlene Burk, Julie Nilsson, Angie, Peterson
Krista Staton, Vicki Price, Randa Wacaster, Jodi Frank, Bertha MacMillan

Now keep hopping on over to Shirley Ross's Blog to see what Holiday Magic she has created and ENJOY the inspiration on the rest of the hop.

Tuesday, September 20, 2011

A "spooktacular" technique

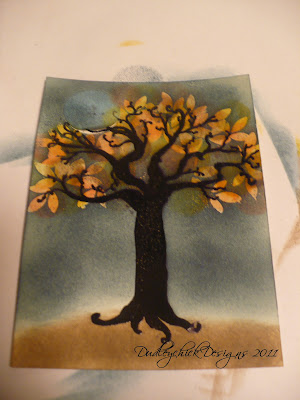
This is one of my favorite fall/Halloween techniques. I recently did a bunch of cards for a swap using this technique and then I pulled it out again for my card club on this month. It takes a little time but the results are spectacular don't you think.

 Now here is a little tutorial to show you how to make your own spooky scene.

You'll need:
Versamark ink
Embossing powder in clear and black (and separate trays or paper plates so they don't mix)
Post It notes
1" circle punch
Sponge daubers/ foam tools
CTMH  Exclusive inks in Honey, Sunset, Chocolate, Outdoor Denim, and Black
Tree Stamp set (I used Spellbound which is retired but any tree set will work)

Step 1:


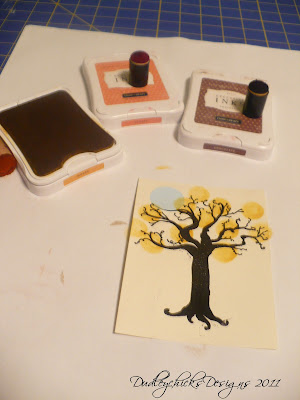
Stamp tree image with Versamark ink. 
Add black embossing powder and heat with heat gun. 

Step 2:

Using a 1" circle punch punch out a circle that will be used to mask out the moon. Add the punched circle to the tree top where you want the moon to shine through. Be sure to punch the sticky area of the post it note so your "moon mask" stays on while you complete the scene. 

Step 3:


Using sponge daubers add fall foliage colors to the top of the tree. I used three colors here, Honey, Sunset and Chocolate. Start with the lightest color and keep adding until the tree top is fully colored. Use the chocolate dauber to add the ground below the tree as well. 

Step 4:
Use the heat gun to heat set the tree top colors so they 
won't hold the embossing powder during the next step.


Step 5:

Using a leaf stamp (this one is from the Grown With Love set) and Versamark ink stamp leaves over the colored tree top area at the ends of all the branches. It will be hard to see where you are stamping but it doesn't have to be perfect, just start at one side and work your way across the tree. 

Step 6: 


Add clear embossing powder. Tap off excess (don't worry of some sticks to the already embossed tree). Heat with heat gun making sure all of the leaves turn clear.

Step 7:

Using the foam tool (or sponge dauber) go over the entire top of your card with Outdoor Denim ink creating a night sky. Be sure your "moon mask" is secure through this process. Continue until desired darkness is reached (less for a twilight look, more for a midnight sky).

Use a paper towel to rub off any excess ink from the clear embossed leaves.
Remove "moon mask" to reveal a spooky full moon. 


Step 8:

Add additional spooky images like the black cat and bat shown here from the Wicked August SOTM or the fence shown in the version above which is also included in the Spellbound set. 

Finish it off with a coordinating mat to make the colors pop.
I used Sunset.
Attach to a card base and wait for the oohs and aahhhs.

As seen on
Tip Junkie handmade projects

Monday, September 19, 2011

First Christmas Card classes scheduled


Wonderland Card Class
See the Class Schedule tab in the menu bar above for more details.

Monday, September 12, 2011

2 Year CTMH Anniversary + My Story = Blog Candy!!!


Today is my two year anniversary as an Independent Consultant with Close to My Heart!


What better time to share my story. I was first introduced to scrapbooking about 20 years ago when I was invited to a Creative Memories party. I thought it was a cute idea and it looked like fun but honestly as a struggling single mom I just couldn't justify spending money on scrapbooking when I was having a hard time paying the bills.

Fast forward a couple of years and I am doing better financially and even managed to take a spring break trip to visit a friend and explore the Oregon coast. I bought a new camera for the trip and took tons of pictures! It was on that trip that my friend took me to her sister in law's house. She was a Creative Memories consultant and was having a huge clearance sale. I bought a few things and took them home to tackle my first project. My daughter Ashleigh's baby book was done in those old peel and stick albums that were so prevalent in the 80's (little did we know we were ruining our memories with those albums). I decided to take it apart and re-do it to make it better and make it all archival in the process. That project got me hooked! Here are a couple of pages from that very first album.


I look at that album now and I cringe. I did so may things "wrong" by today's scrapbooking standards. It is full of stickers and photos cut in weird shapes with fancy scissors, but I do still treasure it because it was the first scrapbook I ever made.

As the years passed I continued to scrapbook major events like birthdays and vacations and enjoyed making our memories into beautiful art filled books. I even got Ashleigh hooked and she created her first scrapbook of her trip to England in the 8th grade.

I was first introduced to stamping at a Stampin' Up party about 12 years ago. I had stamped before but never made cards or used stamping in my scrapbooks. It was lots of fun and I loved the possibilities. My cousin had joined D.O.T.S. which was the predecessor to CTMH and I enjoyed going to her house to play with her collection of stamps, papers and inks. By then I had started my own collections and before long I was scrapbooking and making cards on a fairly regular basis.

In 2006 when my daughter was heading off to college I decided that I needed something to fill my time as a "empty nester" so I took a part time job at Archivers teaching classes and hosting crops. It was at Archivers that I fell in love with clear stamps. I loved working there and made many good friends that share my passion for paper crafting. Some of those friends are my best customers today. I loved the people, seeing all of the new products and getting paid to craft but I didn't like working 16 hour days (I still had a regular full time job too) standing for hours on end and cleaning public toilets. I quit Archivers in June of 2009, but really missed my creative time.

One of the people I met at Archivers is Vicki Price. I knew she was a CTMH consultant and had always admired her work, plus we got along really well. In September 2009 I called her and asked what I needed to do to join. I think she was probably surprised because she did not recruit me at all, I sought her out because I knew she had a local group and that was important to me. I really just wanted the discount and a group of friends to craft with. What I got was so much more! Here are a couple of the cards I made at my very first CTMH consultants group meeting.

Not sure why this one is sideways, but you get the idea.

As they say, the rest is history. I am so glad I joined this wonderful company! It has kept me sane during my time of unemployment. I have made some amazing friends and I even got to go to convention in Disneyland this year. I am growing my business in hopes that someday I will be able to support myself doing what I love.

Now,  if you have made it through that long winded story you deserve a prize! Post a comment here and tell me how you first started paper crafting and one week from today on September 19th I will choose a winner to receive a fun prize including a mini stamp set, embellishments and more!

Sunday, September 11, 2011

I am pleased to accept this AWARD...

I am not usually a fan of the "pass it on" blog awards. But I really do like this one, thanks Janice Wilson.


This one is about recognizing all of us little bloggers out there with less than 200 followers. What a great way to share the love and boost our followers.  Janice has a great little blog too, so be sure to check her out!

 Now it is my turn to pass the award on to 5 of my favorite blogs that have less than 200 followers.  I am hoping to catch a few more followers and help others in the process. So click on the link to follow me if you haven't already and then check out these other creative bloggers and follow them too. 

 It was so hard for me to choose just 5,  I have a bunch of favorites and there are so many great blogs out there.  Here we go,  if you are listed below pass this one on so we can keep boosting each others following.


Now, if you visit each blog and follow each one you like the numbers will increase dramatically and you will have made numerous new friends and contacts!

Pin it