Saturday, December 31, 2011

January SOTM Blog Hop ~ Little Reminder


Hello and welcome to 2012! I hope you had a lovely holiday and are getting ready for an awesome new year! I know CTMH has some great things in store for 2012. This month we are hopping to see all of the beautiful projects created by the final SOTM set in the Autumn/Winter Idea Book. 

If you have arrived here from Georgia Hauglid's blog then you are on the right track, 
keep on hopping for some amazing ideas.

 S1201 - Little Reminder
This fun set is a great way to remember dates on anything from cards to invites, to scrapbook pages.
There are just so many possibilities.
And once again some of the images coordinate with the Art Philosophy Cricut cartridge.
Don't you just love that?

I made this card months ago, long before my move so I would be sure I had it done. 

It ended up being for my cousin, who is expecting a baby boy in early February. I will leave the dates blank so that she can fill in the birthdate and add the card front to her scrapbook. I love how the colors in the Dreamin' paper pack are perfect for a little boy, but the designs may not be what you think of first for a baby card. The versatility of the CTMH papers and the beautiful color pallates make thinking out of the box a bit easier. 

Here is what I used for this card...
Dreamin' Level 2 Paper Pack
January 2012 SOTM- Little Reminder
B1368 Baby Love
Exclusive Inks in Chocolate and Pacifica
Chocolate Grosgrain Ribbon
Blue Button Assortment
Chocolate Waxy Flax

Here are a couple more photos of some of the cards made by my swap group consultants.
Aren't they a bunch of talented ladies!


Now hop on over to Pamela O'Connor's blog,
I am sure she has created something spectacular. 

Remember, Little Reminder is only available through the month of January. 

And then we'll all be excited for the NEW IDEA BOOK that launches on February 1st!

Happy New Year and Happy Hopping!

Wednesday, December 14, 2011

A Little More Mistletoe


Last year I did a Christmas card class where each person made 20 cards using simple mix and match layouts with papers from the Mistletoe paper pack.

It was one of my best attended classes to date. However, when I was calculating how much paper I needed to order for the class I accidentally DOUBLED the order! So, this year I have LOTS of left over Mistletoe paper. It's ok because I really do love the classic Christmas colors (Cranberry, Olive and Chocolate) and the simple elegant designs of Mistletoe.

Somehow, when I moved out of state my Christmas card list grew. Not that I am complaining, I am glad so many of my friends want to stay in touch.When I got to Utah I told my friend Angie I needed to make more Christmas cards and she was game so we got out the Mistletoe papers and the Christmas stamp sets I had saved from the jumble of the storage unit and set to work. Here are just a few of the cards I created. I sent about 60 cards this year, hoping to get at least half that many in return.


I even helped Angie create this year's Christmas card 
from the Dean family (although I forgot to take a pic of it).
And she happily created lots of cards on her own (I didn't take pics of those either, oh well)
I think I have converted her to my form of therapy. 

Wednesday, November 30, 2011

December SOTM Blog Hop- Mad About You


Hello, and welcome to our final blog hop of 2011.
If you have arrived here from
 then you are on the right track.
Keep on hopping, it's a great big loop
of awesome artwork and ideas. 

It's hard to believe that we are so close
to celebrating another new year.

Is your holiday shopping done? 
Are your cards finished and ready to mail?
If you are like me, then the answer to both of those questions is "no".
I am using moving to a new state 
a couple of weeks ago as my excuse, what's yours?

It's a good thing I finished my card for December BEFORE the move, since my craft supplies are still a bit scattered . In fact my entire ink tower was MIA until just a couple of days ago. Luckily a rescue dig mission into my temporary storage unit was successful and the missing ink tower and camera were located...so on with the SOTM post.

This month's set is called Mad About You and it is full of lovely images and sentiments to celebrate love and Valentine's Day. There are even three of the images that coordinate with the Art Philosophy Cricut Cartridge!

As soon as I saw this set I knew what I wanted to do. The "Over The Moon in Love with You" tag just begged to be used with a moonlit scene. So here is the card I created...

I used one of my favorite sets, Childhood Portrait for the sweet couple on the bench as well as the trees and the grass. I just love the silhouette images in the Childhood portrait set and have used them over and over again. The moon was masked out with a circle punched from a post-it-note while I sponged the sunset with large foam texture tools. Remove the circle and viola' a full moon! The window was cut using the Art Philosophy Cricut cartridge and kraft paper. I love how the scalloped edge of the card front looks kind of like an awning and finishes off the scene perfectly. This would be a sweet card for that special someone in your life, or even for a wedding or anniversary.


Supplies Used:
Elemental Level 2 Paper Pack
Kraft Die Cut Cards
Exclusive Inks in Chocolate, Sorbet and Pacifica
November SOTM - Mad About You
Childhood Portrait
Sorbet Stitched ribbon
Art Philosophy Cricut Cartridge

Thanks for looking, no hop on over to 
to see what amazing art she has made. 

Remember that you can only get the awesome set
through the month of December so be sure Santa knows if it is on your list!

Monday, October 31, 2011

Nov. SOTM Blog Hop - Cherish The Day

Hello and welcome to the November SOTM blog hop. If you have arrived here from Helen's blog you are on the right track. She also has a list of all the participating hoppers in case you get lost along the way. It's a great big circle so just keep on hopping to be sure you get to see all of the great ideas.

This month's set is  Cherish The Day. And there are a whopping 44 stamps in this set!

There are just so many possibilities for these little customizable tags. You can literally use them for ANY day of the year and EVERY occasion! What other stamp set can you say that about? I really think this set will be a staple in my craft tote from now on. Cards, layouts, tags...I could go on and on!

Since I am getting ready to move
I have had to limit my crafty time 
so I just made this card for my SOTM swap. 
 But, I am sure this set will get lots more use in the future.

My paper pack assignment for this month was Roxy so what better than a Valentine card? 
I know, I know, it's only November but us crafty card girls
have to stay ahead of the game so we have time to
crank out our fun holiday cards.
My Christmas cards are nearly done,
so Valentine's is the next major holiday I am thinking about. 

Here us what I used...
Roxy Level 2 paper pack
Art Philosophy Cricut cartridge
Cherish The Day Nov SOTM
Art Philosophy Seasons Stamp set
Love Life stamp set
Bling Assortment
Exclusive inks in Tulip, Desert Sand and Black

Now hop on over to Wanda's blog to see what awesome ideas she has using this set. Remember, that Cherish The Day is only available in November so get this great set while it lasts. But don't forget that if you order $25 worth of stamps in November you can also get the awesome Holiday Wishes stamp set for just $5. For more info on that deal click HERE.

Tuesday, October 25, 2011

Repost - Make your own glitter ornaments using reinkers

 
NOTE: I am in the process of a move so I may not be posting anything really new for a little while, so this is a re-post from last year. If you haven't tried these yet you should. Enjoy!

As with many of the things I create I cannot take full credit for this idea either. I saw this for the first time last year on another blog. I wish I could remember where so I could give credit but I read so many craft blogs I really have no idea where I saw it originally. 


This is a fun an easy way to create custom glitter ornaments
in any color you want.
The possibilities are truly endless. 
Here is what you need:
  • Clear Glass Ornaments 
  • CTMH Re-Inker in your favorite colors
  • Prisma Glitter
  • Funnel
  • Paper Towels
  • Opaque White Stazon Ink
  • Small stamps and clear blocks
  • Toilet Paper Tube
Remove hanger from ornament. Fill with 30 drops of re-inker in the color of your choice. Remember that the re-inker is very concentrated so colors will be darker that when stamping with the inks. You may need more or less depending on the size of your ornament. 
 Roll ornament in a circular motion with your hands 
to swirl the ink evenly over the entire inside. 
Be sure neck of ornament is facing down and you have paper towels
over your work surface to catch any drips.


Continue rolling and swirling until ink has covered entire 
inside surface including the neck. A toilet paper tube cut into thirds makes a perfect stand for your ornaments 
while you are working on them.

The ornament shown has an opal type finish.
Clear ornaments are available in truly clear or with the opal finish. 
Both varieties work well for this technique. 
I have a couple of the non opal ones shown below.

Using a funnel, add about a teaspoon of prisma glitter. 
This works best when done immediately while ink is still wet.

 Hold a small piece of paper towel over the opening and shake well until glitter covers the entire inside surface.


This is what your glittered ornament will look like.


Dump any extra glitter into a small cup and save for another project. The glitter will be tinted so do not try and dump it back into the original container, but I ended up with some fun
multi colored glitter to use later.

You COULD stop here and have a plain glittered ball. 
But it is even more fun to decorate the outside too.
I used Stazon Opaque White ink and a small snowflake from the Snow Flurries set. Stamping on the round surface of the ornament takes practice so have some stazon cleaner on hand to remove any smears or smudges.
It was hard to get a good picture of the stamped image with the light reflecting off the glass but you can kind of see it here.
Here are three ornaments I did in about 10 minutes time. The colors I used are from left to right Lagoon, Pacifica and Pear. The Lagoon one on the left was done with the opalized ornament and the Pacifica and Pear are plain clear, just so you can see the difference.

Allow them to dry several hours or overnight 
before reattaching the hanger. 

So what color will you try? There are SIXTY Close To My Heart colors to choose from so you can make these ornaments to match any decor.

To order prisma glitter or re-inkers click on the link to my website on the right sidebar. 
Enjoy!

Thursday, October 20, 2011

Card Club Farewell

This past Friday night was my last card club meeting in Denver before I move to Utah next month. I have a great group of ladies and I am really going to miss them. I am so happy though that one of them has decided to become a consultant and continue the group, she is going to be great and they will continue to have great fun and creative times without me. I feel kine of like I did when my daughter went off to college, only this time it is me who is moving on.

Here are the projects we did at our final meeting


 One of the things I love the most about the Art Philopsphy cartridge is the 3D boxes. This fry box has to be one of my favorites (at least until I make one of the other ones). I made this one as a cute little Halloween treat. I will admit that the bags used to hold the M&Ms were purchased from Stampin' Up. I know you can get them elsewhere too but I was invited to an SU party so I couldn't resist.

Supplies Used:
Art Philopsphy cartridge (fry box cut at 7")
Mischief Paper Pack
Black Ink
Black Waxy Flax
All Hallows Eve Stamp Set
1" x 8" clear cello bags (from SU)
M&M candies in fall colors

 
This card is based off of one I saw on fellow 
consultant Vicki Wizniuk's blog.
You can see her original version HERE. I cut the scalloped card base and the circles for the wreath using the Art Philosophy Cricut cartridge. Did you know that there are more than 100
different card shapes on the cartridge? I LOVE that! 

Supplies Used:
Art Philosophy Cricut cartridge (card base cut at 4 1/2")
Dreamin' paper Pack
Remarkable Wreath Stamp Set
 So Grateful Stamp Set (for the leaves)
 Inks in Chocolate, Autumn Terracota, Creme Brulee and Pacifica
Chocolate Grosgrain ribbon
Colonial White Button
Chocolate Waxy Flax

Thursday, October 6, 2011

The Icing on the Cards

When I first saw the new catalog at convention back in July I was immediately drawn to the Wonderland paper pack. I loved the colors because it was something different from the traditional red and green of holiday papers. Plus, I am partial to the chocolate and blue combo (those are the colors of my bedroom). Another thing I loved was the snowflake patterns. Sonwflakes are perfect for holiday cards because they celebrate winter and not one particular religious holiday. I LOVE Christmas and enjoy all of the festivities, celebrations and for me remembering "the reason for the season". But, I also have friends of many other faiths on my holiday card list so I try and make some winter cards as well as traditional Christmas cards. When i really looked closely at the accessories that go with the Wonderland paper pack I was especially excited by the Icing Overlays. They are  beautifully printed clear acrylic overlays that coordinate perfectly with the Wonderland papers. I knew immediately that I wanted to design a holiday card workshop using the Icing Overlays.

November was my month to teach the creative project to our consultant group so I decided to get to work on my idea. After all who better to test out a workshop idea than other consultants. Here are the cards I came up with.


I designed 10 cards using the Wonderland Papers, Icing Overlays, Rhinestone Designer Brads, and Stardust Glitter Gel as well as ribbon and clear sparkles. Here are some pictures of the individual cards.
Card 1

Card 2

Card 3

Card 4

Card 5


Card 6
Card 7


Card 8

Card 9

Card 10

I love how they came out and I had so much fun creating and teaching this workshop. Since I created a full cutting guide and full color instructions to share with my consultant group I decided to also post them on the CTMH consultants' bulletin board. The response was huge, I am so flattered that some many other consultants are enjoying these cards too. So since I am in the sharing mood here are the links to the printable  cutting guide along with the supply list and directions to make these cards for yourself.

Directions and Supply list with photos

Cutting Guide


If you would like to order supplies to make your own, you can do so on my website by clicking HERE.

Wednesday, October 5, 2011

Dudleychick Designs is Moving On...

Hi All,

I am having a hard time writing this. You see I have struggled with a BIG decision for a while now and now that it is done I have a hard time telling people the choice I made. I have lived in Colorado since I was 2 years old. It is my home. But with my layoff and a year and a half of unemployment I have had to make some tough decisions.

 I will be moving to Utah next month. It just makes sense for me to go now, to make a fresh start someplace new, to be closer to Ashleigh and find my dream job with one of the major craft companies (I hope).  I will miss Colorado, all my friends here and the Mile High City.

One of the hardest things for me to think about in contemplating this move was YOU, my CTMH customers and friends. You have been so incredibly supportive of my creative venture, and I have really enjoyed the friendships I have made through this business. I will miss you all. First I want to say that I am NOT leaving CTMH. I will continue creating, blogging, teaching and selling all of the wonderful CTMH products, just not in Denver.

What does this mean for all of YOU, my loyal customers and friends?

1. You can still order from me anytime.
Just contact me directly by email, at 720-394-9361 or use my website www/CTMH.com/dudleychickdesigns.

2. I am looking for someone to take my place here. Now is the perfect time to sign up as a consultant for CTMH (see Oct. special below) and I can hand it to you on a silver platter. I would love to find someone or a few someones who would be willing to continue my card club, classes and workshops here. I will guide you, teach you and even share my ideas, directions and supplies when I can. It's really a win/win situation for someone who is ready and willing to take the plunge. If you are interested please contact me and we can discuss the possibilities.

3. Card Club - If you are a member of my card club there are a couple of ways this could go. We are just getting started on this round so we could just cancel it. But, I would love if one of you (or a couple of you) wanted take over and keep the club going. I will still have card club here on the 14th for anyone who wants to come. Hopefully, we can discuss more details for the future of the group then. Again, if you are interested in signing up and taking over let me know and we can discuss.

4. Classes and workshops - I will still have my Christmas card workshops this weekend. In fact I have a couple of extra kits for anyone who wants to join us. The cost for the class is $25. That class will be the last one I do here. I will be doing additional Christmas card workshops once I get to Utah so I will offer them as a "Class in a box" for anyone who wants to do them here. Pricing will include all the cut and stamped pieces for you to assemble on your own plus shipping. More details on that later.

October Special - FAB FREEBIE

Sign up as a new Consultant between October 1–31 and receive one New Consultant Kit add-on collection of your choice FREE! Add-on collections are normally priced at $40 each and have a retail value of $80 – $130, making this an incredible deal!

For just a $99 enrollment fee, you'll receive a New Consultant Kit packed with business essentials and new products valued at over $280 US/$320 CAN, plus a FREE add-on collection to enhance your kit! Then you can choose to buy one or both of the other add-on collections for just $40 (US&CAN) each. It's an incredible deal!
If you have ever thought about making your paper crafting hobby a business of your own contact me or click HERE to join.

It is an exciting and somewhat scary time for me, but I like adventure. So wish me luck in Utah!


LeAnne Dudley
Close To My Heart
Independent Consultant
http://dudleychickdesigns.blogspot.com
www.dudleychickdesigns.myctmh.com
dudleychicks@gmail.com

"Blogtoberfest!"

Photobucket

Happy BLOGTOBERFEST! 

What is Blogtoberfest you might ask. Well, it is the brain child of one of my fellow CTMH consultants, Tresa Black. She is also known as The Stamp Goddess and she is known for her Fabulously Artsy Blog and her amazing creativity. I got to see her in action this year during the Extravaganza portion of convention. She is truly inspirational. But back to Blogtoberfest, Tresa created it to help all of us bloggers take our blogs up a notch, to go bigger and better. So, I am jumping on the Blogtoberfest train and making it my goal to post at least twice a week, to create more tutorials and share more of my art and of myself. So if you have a blog and you are so inclined join us for Blogtoberfest by clicking here.

Friday, September 30, 2011

October SOTM Blog Hop - Holiday magic


Hello and welcome to the CTMH October Stamp of the Month Blog Hop.
If you have arrived here from viewing Angela Tutton's fun creations then you are hopping right along.

I know it's only October but it's beginning to look a lot like Christmas around here,
and it's just in time to get some fantastic ideas for your holiday projects this year.

The October Stamp of the Month set Holiday Magic is so much fun.
This set includes 18 mix and match holiday images for unlimited possibilities. 


This month for my swap I was assigned the Typeset paper pack to go with this set. You may not think of the Typeset papers as being at all "Christmasy", but I actually really enjoy thinking outside the box and using papers and materials in unexpected ways. Here is what I came up with.


I wanted to create a  vignette, something like the decorated shop windows you see during the holiday season.  I used the Art Philosophy cartridge to cut the "window" as well and the trees. It makes everything so much easier. Too bad the sleigh and rudders weren't on the cartridge as well. I would never have attempted to make multiples of a card like this with so many cut pieces before Art Philosophy, but now it's possible!

Supply List:
Typeset Level 2 paper pack
Holiday Magic Oct SOTM 
Clear Sparkles
Bronze Glitz Glitter Gel
Stardust Glitter Gel
Exclusive Inks in Juniper, Creme Brulee,Vineyard  Berry
Cricut Art Philosophy Cartridge
Foam Tape
Here are the cards from my entire swap group. Such talent!
From top left cards created by; LeAnne Dudley, Cathlene Burk, Julie Nilsson, Angie, Peterson
Krista Staton, Vicki Price, Randa Wacaster, Jodi Frank, Bertha MacMillan

Now keep hopping on over to Shirley Ross's Blog to see what Holiday Magic she has created and ENJOY the inspiration on the rest of the hop.

Tuesday, September 20, 2011

A "spooktacular" technique

This is one of my favorite fall/Halloween techniques. I recently did a bunch of cards for a swap using this technique and then I pulled it out again for my card club on this month. It takes a little time but the results are spectacular don't you think.

 Now here is a little tutorial to show you how to make your own spooky scene.

You'll need:
Versamark ink
Embossing powder in clear and black (and separate trays or paper plates so they don't mix)
Post It notes
1" circle punch
Sponge daubers/ foam tools
CTMH  Exclusive inks in Honey, Sunset, Chocolate, Outdoor Denim, and Black
Tree Stamp set (I used Spellbound which is retired but any tree set will work)

Step 1:


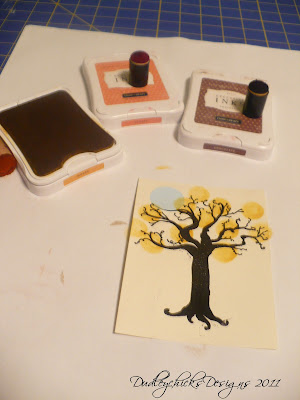
Stamp tree image with Versamark ink. 
Add black embossing powder and heat with heat gun. 

Step 2:

Using a 1" circle punch punch out a circle that will be used to mask out the moon. Add the punched circle to the tree top where you want the moon to shine through. Be sure to punch the sticky area of the post it note so your "moon mask" stays on while you complete the scene. 

Step 3:


Using sponge daubers add fall foliage colors to the top of the tree. I used three colors here, Honey, Sunset and Chocolate. Start with the lightest color and keep adding until the tree top is fully colored. Use the chocolate dauber to add the ground below the tree as well. 

Step 4:
Use the heat gun to heat set the tree top colors so they 
won't hold the embossing powder during the next step.


Step 5:

Using a leaf stamp (this one is from the Grown With Love set) and Versamark ink stamp leaves over the colored tree top area at the ends of all the branches. It will be hard to see where you are stamping but it doesn't have to be perfect, just start at one side and work your way across the tree. 

Step 6: 


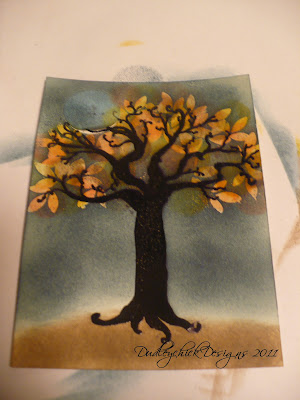
Add clear embossing powder. Tap off excess (don't worry of some sticks to the already embossed tree). Heat with heat gun making sure all of the leaves turn clear.

Step 7:

Using the foam tool (or sponge dauber) go over the entire top of your card with Outdoor Denim ink creating a night sky. Be sure your "moon mask" is secure through this process. Continue until desired darkness is reached (less for a twilight look, more for a midnight sky).

Use a paper towel to rub off any excess ink from the clear embossed leaves.
Remove "moon mask" to reveal a spooky full moon. 


Step 8:

Add additional spooky images like the black cat and bat shown here from the Wicked August SOTM or the fence shown in the version above which is also included in the Spellbound set. 

Finish it off with a coordinating mat to make the colors pop.
I used Sunset.
Attach to a card base and wait for the oohs and aahhhs.

As seen on
Tip Junkie handmade projects

Pin it